31 May 2012

Recap and Goals

May!  Most of the time when I write this post, I feel so glad that the previous month is over.  Don't get me wrong, I enjoy life.  But May could have lingered for a while longer.  In particular, my week in Ecuador could have lingered on for a while, and Memorial Weekend definitely could have lingered - I still feel like I could go for more camping!  Possibly my favorite part of May, however, was the change in weather: it is finally warm enough to enjoy a cold beer out on the porch.  And I did.  On several occasions. 
  • Spanish lessons at lunchtime, which I totally did with ridiculous faithfulness (okay, maybe my resolve weakened on Fridays)
  • I went to Ecuador for a week!  Blog forthcoming.  Sneak peak above.
  • But I kept giving you blogs with a gardening theme...which was a real test of what I had learned as well.
  • We also went on a mini hiking trip with friends!  Blog forthcoming.  You know the drill.
  • Speaking of friends, one of mine just got a new job, so we had a celebration for him!  The fondue was a hit.
  • Bottle wine.  Wow.  This did not even come close to happening.  Which means that next month is going to require both bottling AND starting a new batch of wine.
As always, onward and upward.  What will June (June?!  Already?!) be bringing?
  • Well, wine.  Bottling, and starting a new batch.  Blueberry?  Depends on prices I guess.
  • Keep you updated on my garden!  Fun things are happening, and they make me feel like a successful human being!  Maybe I'll do a "harvest month" segment this fall to briefly cover things like canning/drying/freezing and seed saving.
  • I totally fell off the Paleo wagon with all this traveling, and I've been suffering the consequences.  So, first order of business, get back on track with chipotle meatballs with guacamole.
  • But, in all fairness, I'm already planning on falling off the wagon with Swedish Cloudberry Parfait (and since cloudberries are somewhat scarce in these parts, it will probably be strawberry with a hint of watermelon).
  • Summery things!  Memorial Day kicked off the great weather, so now it's time for camping and/or campfires!  Let's make it happen, friends!
  • Reformat my laptop.  I already know this isn't going to happen, but it IS on the list.  A (nerdy) girl can dream, right?
  • Kahlua!  Kyle's mom has a great recipe.  And if you're willing to make your own kahlua, you will undoubtedly be willing to make the chocolate syrup that goes into it.  Bob, if you read this, I believe we will join you for white russians sometime soon :)
 Such a great group to go hiking with!  And I just want to say that anything that involves new friends is definitely a worthwhile venture.  Oh, and let's not forget that one of the people in the above photo earned a fondue party for his new job!
So May...great month.  Great.  I really appreciate all the people in my life and all they do for me without even realizing it.  You guys are great!  And I also want to thank the people who have told me they like this blog...because sometimes I forget that people actually read it(!).  Anyway, it's nice to have a little validation every once in a while that I'm not just a crazy person cooking up kitchen disasters and garden foibles.  Speaking of which - I just found out today that I definitely planted radishes in some square footage dedicated to cucumbers.  Whoops!  Too late to do anything about it now :)

29 May 2012

Garden Disasters

That's right.  My disasters are not just confined to the kitchen.  It's a little bit funny, because this is kind of a 'pre-kitchen' food disaster due to a pre-historic beast in my garden.  Cue the Jaws theme music.
Actually, this is just one beast of several, though by far the most interesting (and the only one caught on camera).  Internet, meet Giant Snapping Turtle.  Giant Snapping Turtle...please go away.  I swear, I leave for one week, and the whole neighborhood jumps in my garden.  There are holes everywhere.  The one below is most likely for a skunk looking for grubs.
And these holes were undoubtedly made by the snapper, with good odds that one of them is full of eggs.
I did NOT put all that effort into double digging just so that the neighborhoods animals could take it easy.  This garden is for food!  So, to protect my food, I enlisted Kyle's help in erecting a fence.
Low-tech, low-cost, and low-maintenance.  It might not last more than a year, but since this isn't my yard, I don't want anything too permanent.
Of course PVC was involved.  Is there ever a Kyle-project that doesn't use PVC?
Since the perimeter is my main access for the block beds, he left one side so that I could lower the fence and get to my plants for weeding and whatnot.  This fence, though necessary, is going to be extremely inconvenient.
Kyle buried the bottom edge of the fence to deter critters from going under the fence.
Voila!  A quick and dirty fence.  Who knows what will happen to my beans now, especially if they have a whole nest of eggs buried underneath them.  Only time will tell.  The good news is that the corn is up!

25 May 2012

Moon Planting

Let’s just start out by clarifying that this in no way, shape or form requires getting up at 1am and
spending a couple hours in the garden. All of your moon planting will hopefully occur during daylight
hours. By bug hour, you should be safely within the confines of four walls. I also want to add the caveat
that this post is a lot less sciency than other tips and tricks posted here, so full disclosure: I ignored the
moon when I planted. Mostly it was a convenience thing – I work, so I plant when I have time.

Now, let’s chat about moon cycles for a hot minute. A moon cycle is the time it takes for the moon to
orbit the earth, roughly ~29 days, with four phases of ~7 days each.
  • Quarter 1:  new moon to quarter moon (waxing / increasing moonlight)
  • Quarter 2:  quarter moon to full moon (waxing / increasing moonlight)
  • Quarter 3:  full moon to quarter moon (waning / decreasing moonlight)
  • Quarter 4:  quarter moon to new moon (waning / decreasing moonlight)
If the moon has enough gravity to move oceans, then doesn’t is also make sense that it can pull the
water in the ground as well? Seeds absorb the most water at full moon.

Waxing Moon
From the new moon to the full moon, the gravitational pull is up and moonlight is increasing, making
this a good time to plant things that grow above ground. This site even gets in more detail, saying
that plants with external seeds should be planted in the first quarter (in my garden: lettuce, spinach,
broccoli), while plants with internal seeds do better when planted in the second quarter (in my garden:
beans, peas, peppers, squash, tomatoes).

Waning Moon

The gravitational pull is high from full moon to new or no moon, and decreasing moonlight means it’s a
good time for a plant to put the energy into its roots. This is a good time to plant underground veggies,
especially in the third quarter (in my garden: carrots, onions, garlic, potatoes, radishes). The fourth
quarter is a good time to transplant, prune or harvest. To inhibit lawn growth, mow the lawn during a
waning moon.

Once again, I have not looked at the science behind any of this and I think it is based more on folklore
than fact. That being said, it can’t hurt to try moon planting, right? Put it on the list for next year, I
guess.

Source 1 and Source 2

22 May 2012

Planting the Garden!

Confession:  there won't be too much information in this post.  I had fun planting my garden and I want to show you photos.  I just got back from Ecuador and I'm not feeling too ambitious :)
If you want some real learning, check out my last post on transplanting seedlings.  In the meantime, I'll tell you some of the things that I planted...on May 10.  These are rows of alternating corn and beans.  The beans are pole beans, so they will (hopefully) begin to climb the corn stalks.
Another confession:  these photos were all taken with Kyle's phone because after I got dirt all over my hands, I was too lazy to go get my camera out of my car.  These are all little rows of greens.  I planted them in alphabetical order so I'd remember what they were:  arugula, lettuce, mesclun mix, and spinach.
May 10 was when I did the vast majority of my outdoor planting.  I did not transplant my indoor seedlings because they'll be fine inside until the danger of frost has truly passed.  I planted some peas on May 1, and they hadn't sprouted yet, and I was mad.  So I dug around in the peas block until I found...a seedling that was about to pop out of the dirt.  Oops!  But May 1 was also when I measured out everything and put kabob skewers everywhere to mark things.  Hence the double measuring tapes below.
Worms are a sign of healthy soil!  And worn-out knees are a sign of well-loved jeans.
After everything is planted, add water!  Since I didn't want to wash any seeds away, I used the hose to simulate rain so that the water fell gently on the ground.
Many thanks to Kyle for the garden photoshoot.  Here's to a happy growing season!


18 May 2012

Transplanting Seedlings

Title:  Transplanting.  Subtitle:  The Brain Surgery of Growing Things.
Container salsa garden:  tomato, garlic, green pepper, and cilantro.
I'm not an expert gardener.  In fact, I've only just recently learned that when you start gardening, seeds are NOT where you should start.  It seems counter-intuitive, unless you've ever tried to grow your own seedlings.  Seedlings are difficult, which makes sense.  When you think about living things, when is the time that they need the most care?  When they are babies!  Similarly, a seedling is a) needy, b) easy to kill and c) very sensitive to changes.  Seedlings require the right conditions - the right temperature, the right amount of sunlight, the right amount of water, etc.  It is much easier and much less time consuming to buy a plant that has already made it past the needy stage.  Once you put plants in the ground, it's a lot more difficult to kill them.

I started my peppers and tomatoes in February.  Peppers are exceedingly frustrating to grow because it takes them SO LONG to germinate, and especially with hot peppers, germination rate is low.  Or maybe that's just my experience with them.  True confession:  my tomatoes look like I planted them a week ago (pathetic).  I will be supplementing them with greenhouse tomatoes.
You don't want to transplant a seedling until it is big enough to handle the transplant.  It's important for the plant to have developed a good root system so that it will hold the soil together when you transplant it - the roots don't like being disturbed.  In order to facilitate holding the soil together, it helps to water the seedling.

To pop a seedling out of the 4-pack, hold the plant very loosely between your fingers and gently squeeze the sides of the cell to break the soil free.
Tomatoes
You should be able to flip the 4-pack upside down without any of the other plants falling out, but still be careful when you invert the 4-pack.  Ideally, all the soil in the cell will come out as a block and will not crumble.  This doesn't always happen, though, and when things fall apart, that's when it starts to feel a lot more like brain surgery.
Broccoli
Carefully set the block in a new pot, then fill in the sides with dirt to support the seedling.
Serrano peppers
When you transplant peppers, you don't really need to bury them any deeper than they were before.  When you transplant tomatoes, you should always bury them as deep as the next set of leaves.  For instance, when transplanting a tomato for the first time, the very first set of leaves should be completely under the soil in the new pot.
Gardening is messy!  But look at how happy all the seedlings are in their new pots.
 In order to get them ready to plant outside, it helps to keep them outside for increasing amounts of time each day.  They need to adjust to the changing temperatures and especially the wind.  It helps to either run a fan on them for a while indoors, or even run your hands through them every once in a while to simulate wind.  Plants like being outdoors far more than they like being in pots though.

15 May 2012

Garden Salad

The last couple posts have been overwhelmingly full of information.  I get it.  It's hard to picture that first juicy tomato when your eyes are blurred by the sweat of moving twenty square feet of dirt.  Keep your eyes on the prize, because the first garden harvest isn't that far away!
The easiest and fastest thing to grow - greens.  They're also fairly hardy against the cold.
Most of the greens I'm growing will be ready to pick in just over a month:  35-45 days.  This year I'm growing arugula, lettuce, spinach and a mesclun mix.  But the best thing about a salad is how you dress it.  Home-grown potted rosemary pairs well with chicken.
But my favorite salad ever has cranberries, pecans, and some feta.
Put it all together and what do you get?  The first meal of the season!
If you like dressing, this salad could handle a light vinaigrette.  I prefer my salads dry, though, so I made sure the chicken stayed moist while cooking.

11 May 2012

Companion Planting

Welcome to Garden Month!  A full month of posts about gardening in a way that will provide you with the most nourishing food possible, while simultaneously leaving the ground and soil as natural and fertile as possible.  The soil is full of nutrients that plants like to use up.  This is the reason that vegetables, when grown the right way, can be so healthy (by comparison, grocery store vegetables have become far more carbohydrate and far less protein).  When I first learned that some plants withdrew nitrogen from the soil while others put it back in, I started looking at other symbiotic relationships in my garden.  Based on this, I laid out a map of what I plan on growing this year.
Click to embiggen
That brought me to a term called "companion gardening."  Plants can be companions for many reasons.  Some plants are big and tall and provide shade to cool-loving plants, or provide climbing space for vine-plants.  Some plants (like marigolds) chase away pests.  Some provide the nutrients that other plants absorb. 

This is what I based the majority of my companioning on.  The plant guide is extensive and has some helpful hints for deterring pests.  I wasn't planning on planting potatoes this year because my youth is full of memories of handpicking disgusting potato bugs.  However, after reading this, there are a number of plants that can help with that problem.  So now I plan on throwing some cilantro (coriander) and marigolds around amidst the potatoes and we'll see how much of a problem I actually have!

One thing you might have noticed is that the layout is not the traditional row-of-plants, walking-row sequence.  I don't know why, but I had to actually be told that so many walking rows are unnecessary.  To utilize the space more effectively, it makes much more sense to plants things in large blocks of garden bed.  This is my MSPaint rendition of John Jeavons chart showing the ridiculous difference between rows and blocks.
Count 'em up, people.  21 plants in the block bed, 15 plants in rows.
This is the argument behind a 5'x20' bed (although that 20' is highly negotiable) of solid plants.  If you can reach 2.5' to weed and harvest, then planting in rows just doesn't make any sense.  I like that my tomatoes are on the end, because sometimes you don't see a sucker until you look at the tomato from the right angle.  Same with potatoes - if I have potato bugs, I'm going to need to get at those guys.

Another argument for block beds is weeds - if your veggies are thick enough, they'll choke out the weeds.

You also might have noticed that I put my squash and cucumbers right next to each other.  There is a myth out there that says them must be far apart to prevent cross-pollination.  I have read several sites that say this is a myth.  But even if you still adhere to this myth, it's important to note that if cross-pollination occurs, it won't affect this season's harvest.  If you save the seeds, it's possible that you might grow something weird (but this is only going to happen if have maybe two squashes the cross-pollinate).

Another thing you might have noticed is that I have a couple areas where I have interspersed blocks of different veggies.
Here's what's going on.  Let's say I just planted broccoli there.  Broccoli takes a while to reach full size, which means early in the season, there are empty spaces between plants.  Empty spaces in the garden are where weeds grow.  Alternatively, I can plant a fast-maturing plant there and harvest it before the broccoli get big enough to choke everything out.  Double harvest in a single space!  Talk about utilizing your space effectively.

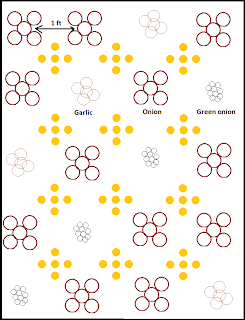
Things get a little crazier when we get over to the onion/carrot/garlic area.  Not only are all of those plants companions, but garlic also chases away many pests.  I'm also going to employ another new technique in this section called multi-planting.  From Jeavon's book, "The concept of the multiplant block is based on spatial rather than linear plant distance in the field. For example, say the average ideal in onion spacing is one plant every 3 inches in rows spaced 12 inches apart. Mutiplants aim at an equivalent spacing of four or five onions per square foot. The difference is that all four onions are started together in one block and grow together until harvest....The onions grow normally in the clump, gently pushing each other aside, attaining a nice round bulb shape and good size."  Benefits:  more onions per square foot.  Only I'm going to intersperse the onions with garlic and green onions too.
Now is where I'm being really crazy.  I've decided to throw some carrots in there too.  If you want to keep a tried and true garden, follow the diagram on the left.  What I'm going to do is try the diagram on the right, and see how much produce I can actually eke out of this square footage.  I will probably only try carrots on part of this bed, because I would like to compare results (and because I actually do want to harvest some onions this fall, I don't want them ALL to fall prey to experiment).

Okay, so there's some info on companion planting as well as a few other planting techniques.  I didn't get too in-depth on this one, so by all means, leave any questions in the comments!

09 May 2012

Double Digging

Welcome to Garden Month!  If you read Monday's post, you know that the best soil amendments increase water- and nutrient-holding capacity and improve aeration and water infiltration.  However, you can improve the aeration without adding a single amendment to your garden!  Double digging improves aeration and breaks up the soil so roots are able to grow freely.  It is inexpensive and doesn't require anything with a motor.
Start with a trench.  1 ft wide, 1 ft deep, 5 ft long.  Put the dirt in a wheelbarrow or buckets.
After you have your trench, use a pitchfork or broadfork to sift through the dirt, trying to reach another foot of depth (blue shaded area below).
Now dig up the dirt next to your original trench.  Take the next 1'x5' of dirt and put it in the first trench.  Make sure to break it all up as you go along.  The end goal here is to have a 24" depth of aerated soil.

If you have amendments that you want to add to the soil, they go in after you've dug the first foot and sifted the second foot of depth.  So the amendments end up being about a foot deep in your garden bed.
This is serious physical labor.  But it feels so good afterward.  Not only have you accomplished something tangible, you've also made your future garden VERY happy.  And this only needs to be done every few years.  It is not an annual process.
Kyle and I double dug a 5'x20' bed in about two hours (over the span of two days).  Our progress was slightly inhibited by the hedge located right next to the garden, which had roots growing out beyond the edge of the garden.
Continue this process, moving a foot of dirt at a time, until you've reached the end of your bed.  The double dug dirt should look almost like a raised bed - you've added so much space in the dirt that it is taking up more volume than before.  I know it looks like Kyle is doing all the work here, but we spent equal amounts of time behind the shovel, I promise :)
When you reach the end of the bed, go get the wheelbarrow or buckets and put all that dirt into the last 1'x5' section.  Then lightly rake everything to create a level surface so all the water doesn't run off or pool in one spot.
Look at the pretty, amended, double dug bed!  Please don't walk on it, because that will just compact the soil again and undo all your work.  And since you shouldn't walk on it, you don't want to make it any wider than 5', because then you will have a hard time reaching the center of the bed for weeding or harvesting.

Vacant soil like this is a haven for weeds, so if you don't plan on planting anything right away, keep the soil covered.  A black tarp that doesn't let any light in is one option (if you let light in, you're just making a nice, toasty greenhouse for weeds).  If you don't plan on planting anytime soon, pieces of cardboard covered with leaf mold or compost is another option - the cardboard prevents weed growth, but also decomposes to create more organic matter.

Soil amendments: check!  Double digging: check!  I think we're just about ready to get down and dirty with some seedlings!

07 May 2012

Soil Amendments for Beginners

Welcome to Garden Month!  Let's talk about soil amendments.  If you're taking the time to garden so that you can feed yourself healthy things, then it stands to reason that you'd also be willing to feed your plants healthy things so that they produce even MORE healthy food! 
Over farming and mono-farming has left the soil depleted.  Think of it this way:  if you had a whole city of people just like you, then when you all went grocery shopping, everyone would be shopping for the exact same foods.  The grocery store would quickly run out of some things, and other things would be overstocked.  It is the same with soil.  If you plant corn for acres and acres, that corn is going to eat up all of the nitrogen in the soil.  This is why farmers need to add chemical fertilizers to the soil.  This isn't sustainable or healthy.  A healthy garden would have diversity, so that some plants would add nitrogen to the soil and other plants would eat it up.

The minerals that are key to the health of the plants and our health are missing in the soil.  So we need to add those back so that the vegetables we grow have all the nutrients that we need.  This is an important reason to grow your own food.  Vegetables in the grocery store today have much lower mineral content than they used to.


Feeding Your Outdoor Garden
So what do you need to add to your soil?  Well, that depends on what your soil is missing.  Here in Michigan, you can send in a soil sample to the MSU Extension office and get a full soil report for $22  (not in Michigan?  You can probably find the same thing at a state university).  In the meantime, here are the things that your soil might want:
  • Compost - recycled organic matter from food preparation, yard trimming, etc.  This link has a very helpful table of things that you can compost, and what they add to the soil.  Composting could very easily take up a whole blog post by itself, but I'm not that intense about composting yet.  Maybe next year.
  • Kelp meal (seaweed!  It's good for everything - feed it to your plants and your animals!) - kelp adds potassium, as well as a plethora of other trace minerals and micronutrients.  It also helps soil retain water.
  • Azomite - adds a lot of trace minerals to the soil. These trace minerals boost plant immunity and resistance to adverse conditions and aid flowering and fruiting.
  • Biochar - the "clinkers" left over in your ash - this leftover organic matter is extremely porous, so it holds moisture and minerals that plants love.  Follow the link for an in-depth lesson on how wonderful biochar is for gardens. 
  • Peat moss - holds moisture, keeps the soil loose, keeps nutrients and minerals from leaching out of the soil.
  • Leaf mold - the easiest thing on this list.  Maybe you have a park nearby that rakes up all their leaves every fall and drops them all in the same place.  At the bottom of that years-old pile. you'll find the mucky, decomposed leaf mold.  Or you can make your own for a little extra effort.  It does many of the same things as peat moss - holds moisture, keeps the soil loose, and it also adds calcium and magnesium.  It is very good for clay soil.
  • Perlite - also good for clay soil, it helps break up the compacted soil and provides better drainage.
  • Greensand - it has high concentrations of minerals (like potassium) and releases them slowly; it is a natural fertilizer.  It also helps the soil hold water.
  • Feather meal - extremely rich in nitrogen.  It provides both a quick boost and a slow release.
  • Rock phosphate - adds phosphate to the soil.  Bonemeal is a good substitute if you can't find rock phosphate.
  • Lime - add this to soil to lower the acidity (aka raise the pH level)
Image sources: 1 2 3 4 5 6

That's a lot of information!  So if you're feeling overwhelmed, just remember this:  The best soil amendments increase water- and nutrient-holding capacity and improve aeration and water infiltration.  

These soil amendments aren't sustainable either.  You shouldn't have to add a ton of stuff to the soil every year in order to grow things.  The idea here is that you remineralize your soil the first year, and next year it won't need quite so much amending.  Eventually, you can start dedicating part of your garden to growing your own compost (like John Jeavons outlines in his book, How to Grow More Vegetables Than You Ever Thought Possible, which is somewhat summarized in this article).  Also you can start practicing companion planting and crop rotation.

So the big question now is how to apply these soil amendments.  I'll go over that in my next post, which will be about double digging.  I also have an upcoming post about companion planting, which will include the layout of my garden this year!

Feeding Your Container Garden
Craig Schaaf's soil mix is great for starting seedlings indoors - he uses them to make soil blocks, which he later transplants into the ground.  Recipe makes 80 qts, or is available for purchase pre-mixed at Craig's farm.
  • 30 qts peat moss
  • 25 qts compost
  • 15 qts leaf mold
  • 10 qts perlite
  • 1 c. greensand
  • 1 c. sea life kelp
  • 1 c. feather meal
  • .5 c. Tennessee brown rock phosphate
  • .5 c. colloidal rock phosphate
  • .5 c. lime
Not the kind of recipe you normally see on this blog! You don't have to dive right into all these things, but if you're a new gardener, the important takeaway here is that in order to grow the best plants and vegetables, you need to start with a healthy, living soil.

Happy gardening :)

04 May 2012

North Country Trail

Hiking.  It's a thing outdoorsy people do.  It differs from a walk in the woods in that you have a very large, full backpack.  Except when you're hiking, it's just called a pack.  These are things that you learn.
Image source:  northcountrytrail.org
You can't look for morels when you're hiking, because then you go too slow and everyone yells at you.  Where 'everyone' refers to Kyle.
This is one of those things where I think "okay, let just grab some gear and go!"  But there's actually a whole sub-culture surrounding this hobby, with very expensive, specialized gear and everything.
We were crouching because we weren't sure we were still in the shot :)
This isn't just a walk in the woods.  This isn't just camping in the wild.
THIS IS THE NORTH COUNTRY TRAIL.

These are things that you learn.